
In 1995 NASA published this picture, taken by the Hubble Space Telescope. It shows a small part of the Eagle Nebula and became instantly famous. Because in the “pillars” stars are born, the picture got the name “Pillars of Creation”.
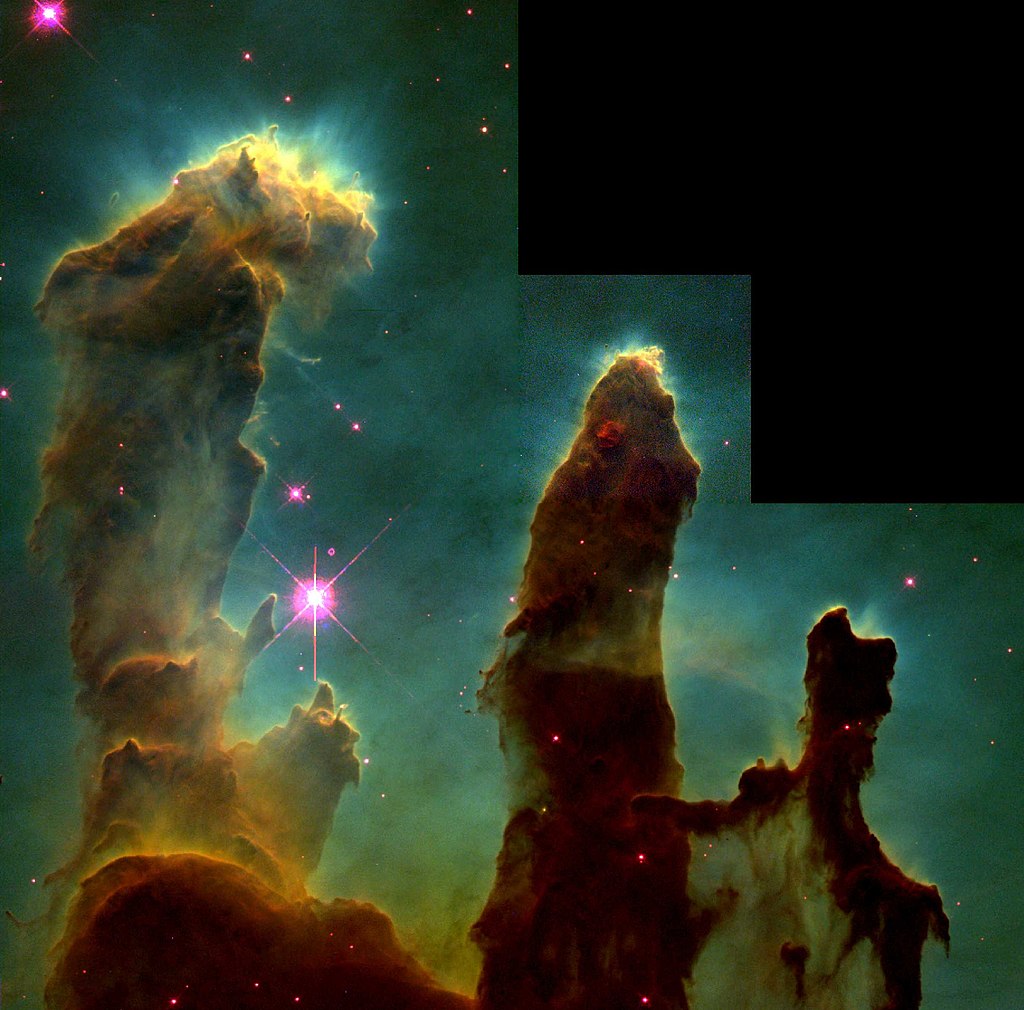
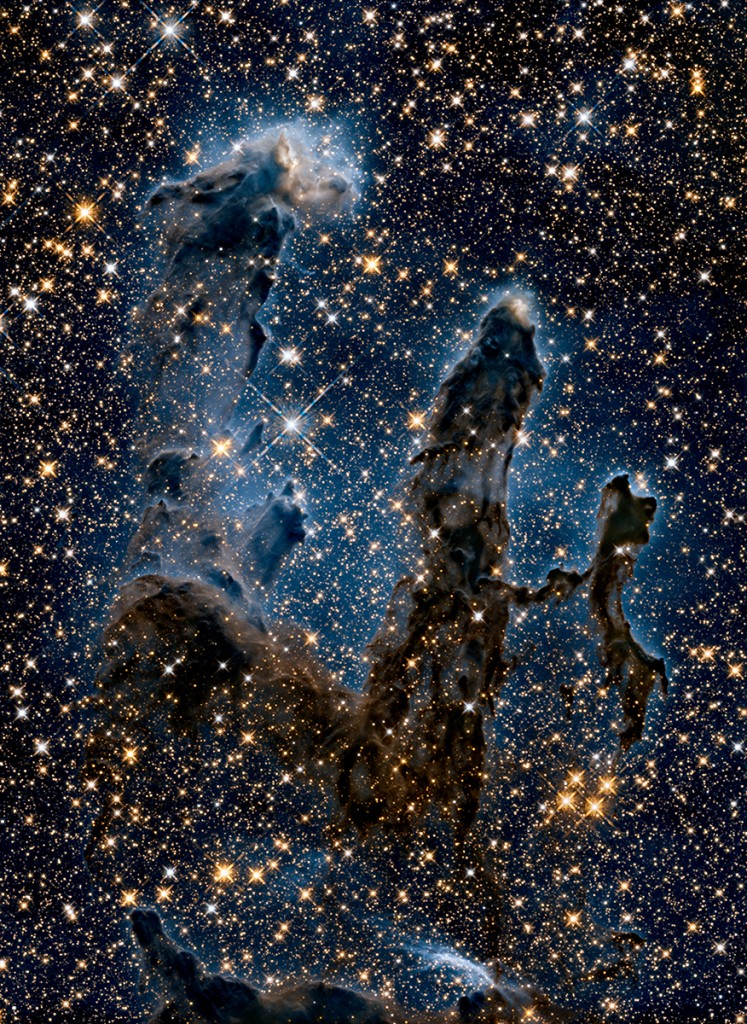
The Hubble Space Telescope was launched in 1990 and is still operating, with quite a few Space Shuttle service missions. To celebrate its 25th anniversary, a new picture of the Pillars of Creation was published in 2015. With a new camera installed, more details are visible,

At the same time this picture was published, an infrared picture of the Pillars. Infrared light can travel more easily through dust and clouds and that is why now you see stars in the pillars, where young stars are still being formed. But I hope you wonder how this can be an infrared picture as infrared light is invisible light. The explanation will be the main part of this post.
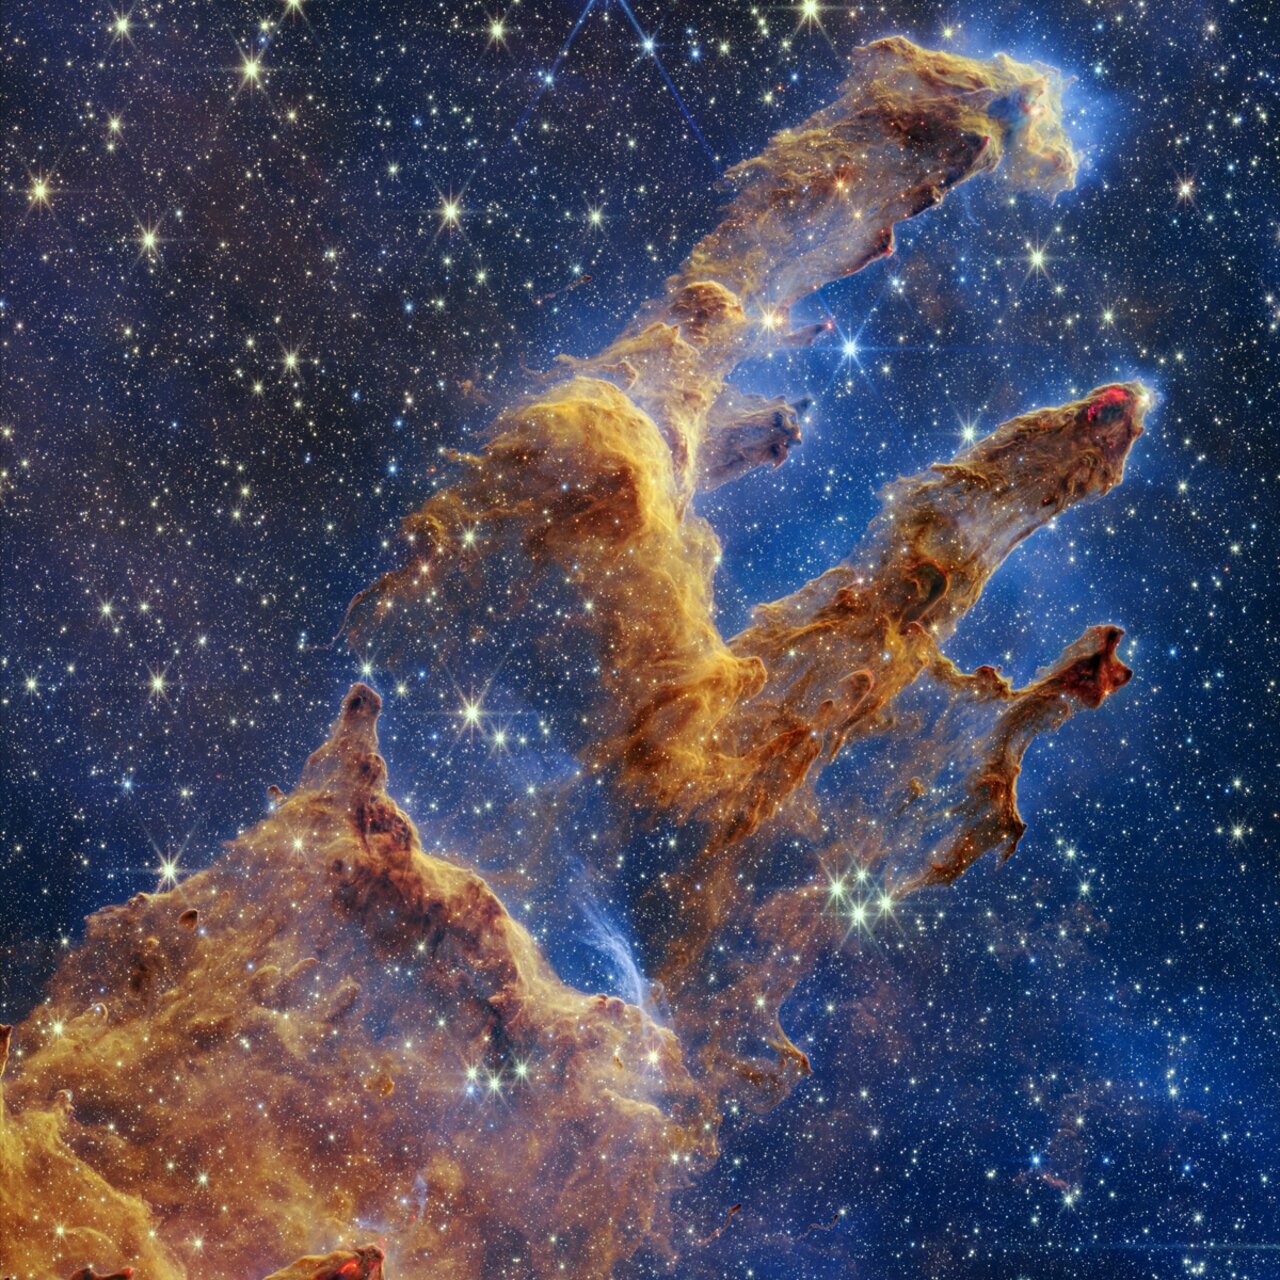
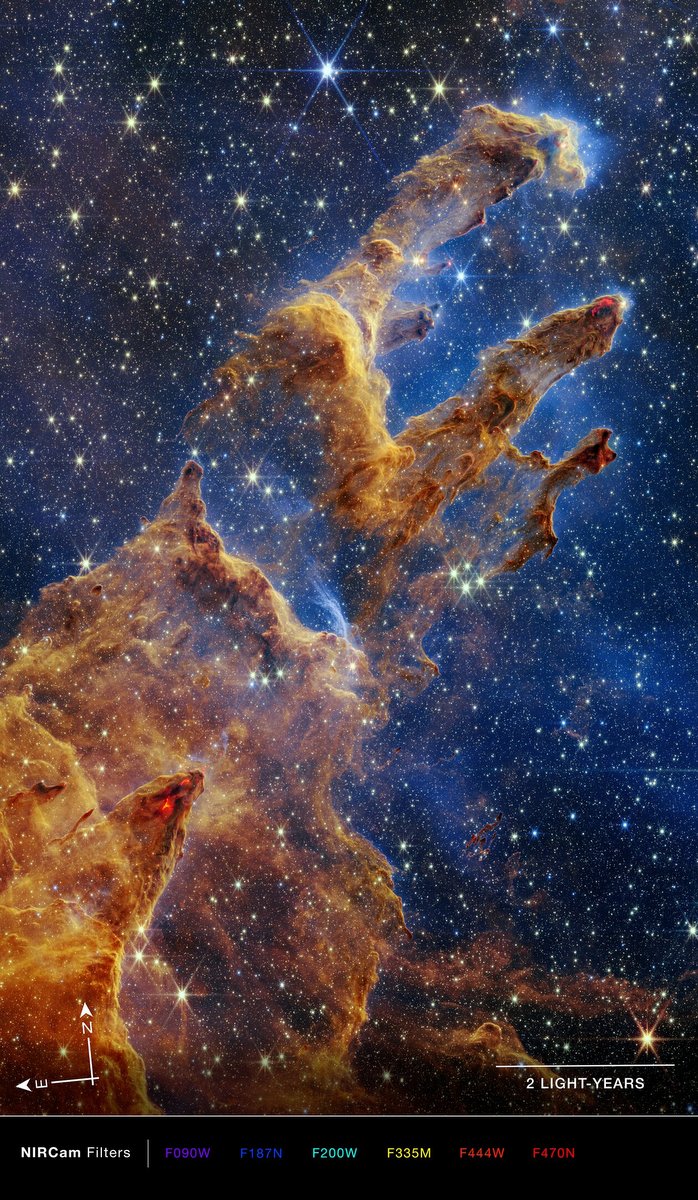
But first here are two pictures, recently taken by the James Webb Space Telescope. The JWST is an infrared telescope has and has two cameras on board to take pictures. The NIRCAM for near infrared light and the MIRI for medium infrared light. Here is the NIRCAM photo
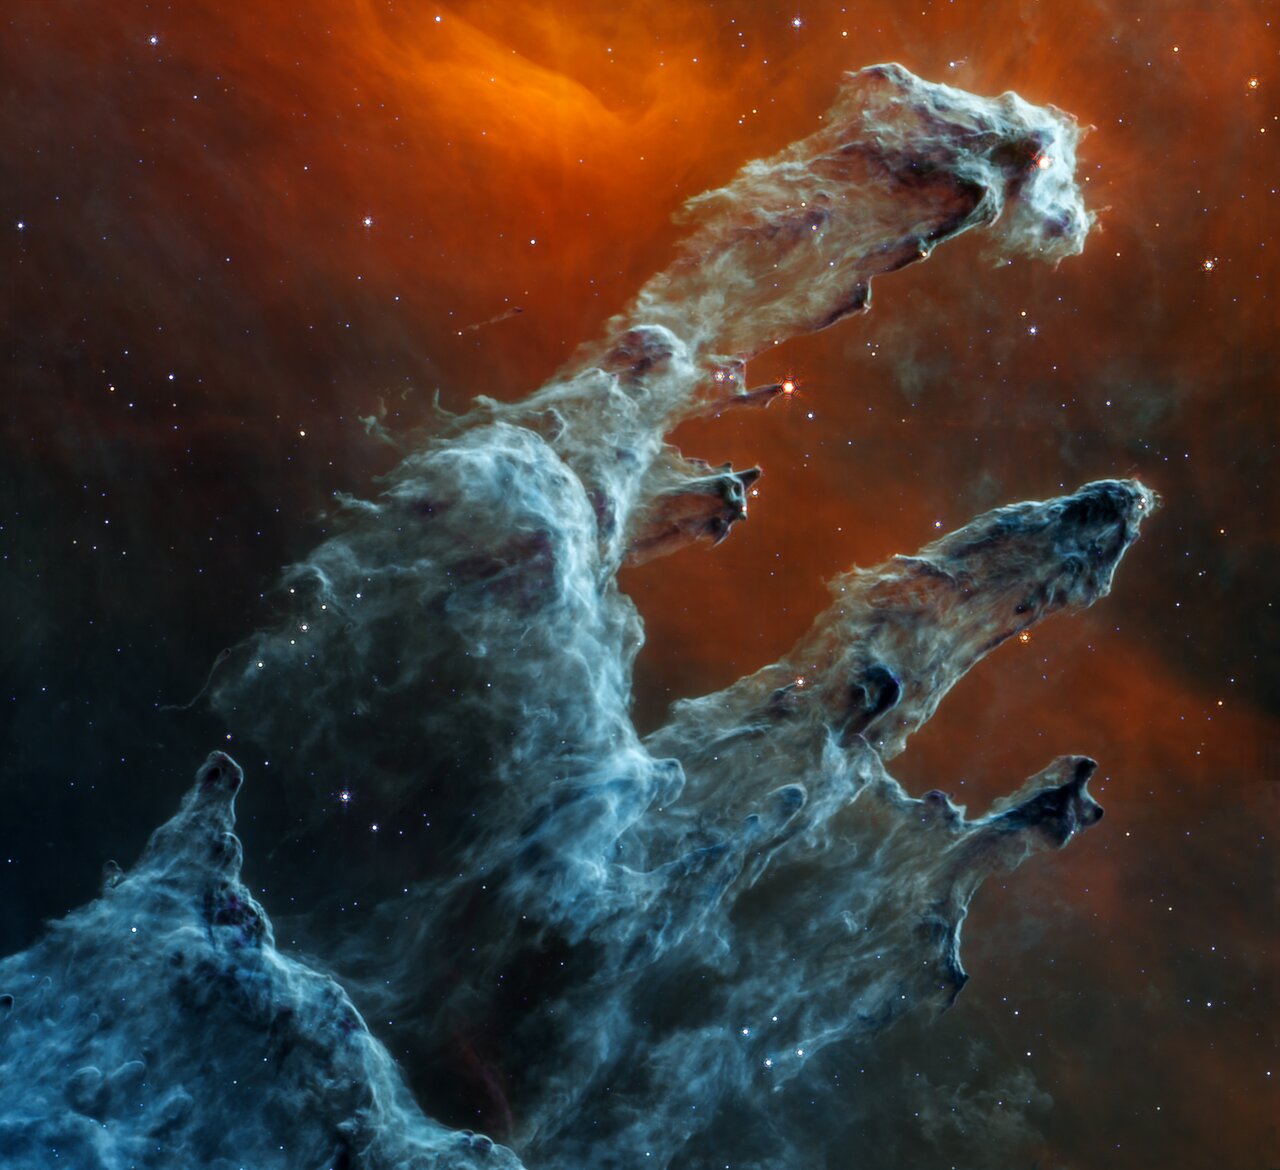
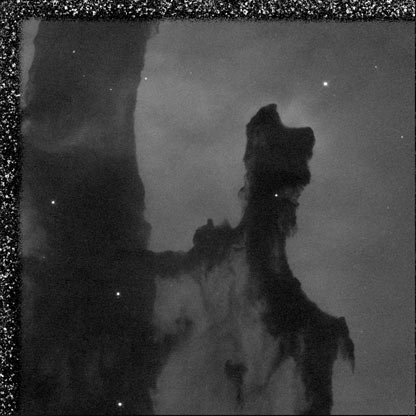
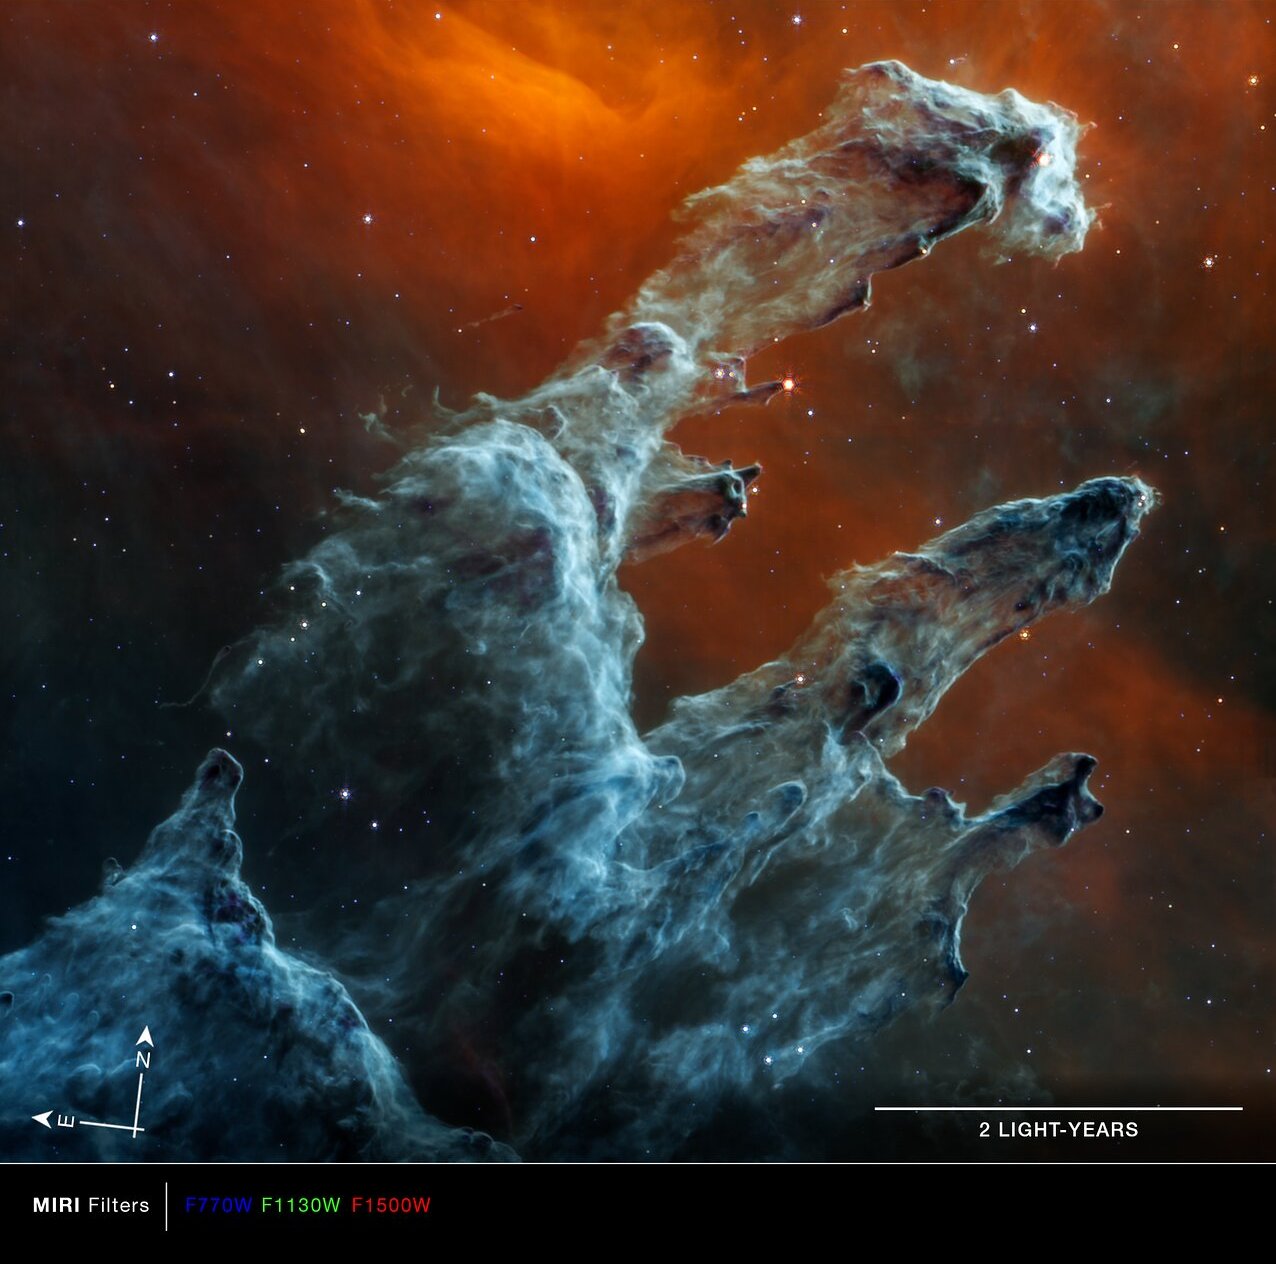
And here is the image from MIRI, Amazingly different. And again, how can these be infrared pictures’?
Time to give some explanation about the pictures and also about the Eagle Nebula, where the Pillars of Creation are located.
———————————————–
About visible and invisible light
Light is an electromagnetic wave, as are microwaves, radio waves, X-rays etc, They all have different wavelengths. The wavelengths of visible light are often given in nanometers (nm), where 1 nm is 1/billionth meter. Or in micrometer (μm) where 1 μm = 1000 nm. The human eye is sensitive to wavelengths between ~380 and ~750 nanometer and sees the various wavelengths as different colors! The longest wavelengths are seen as red, the shortest as purple/blue with all the “rainbow” colors in between.. In this diagram the electromagnetic spectrum is shown. The infrared part can be subdivided in near infrared, mid infrared and far infrared

The Hubble telescope has two cameras onboard. Most of the iconic Hubble pictures have been taken by the Wide Field Camera. The present wide field camera (WFC3) can take photos in two channels, one for ultraviolet and visible light (UVIS) and the other one for near infrared (NIR), The range of UVIS is 200-1000 nm and of the NIR 800-1700 nm
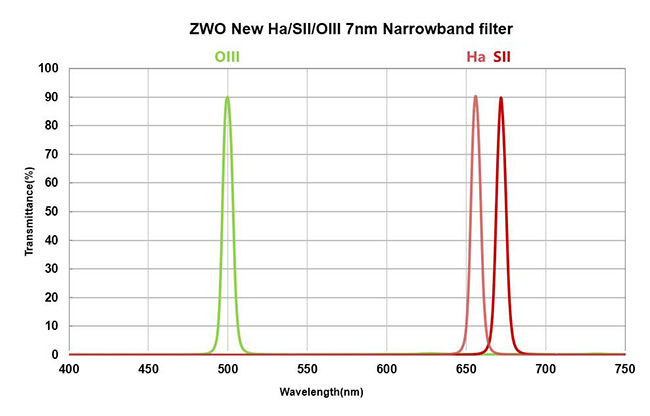
The James Webb has two cameras, the NIRCAM for the near Infrared, range 600-5000 nm and the MIRI for the mid Iinfrared, range 5000-28000 nm (5 μm -28 μm).
Before we describe in some detail how digital cameras record images, it is useful to have a look at the way the human eye sees colors.
———————————————–
How does the human eye see colors?
The retina of the human eye contains about 6 million nerve cells, called cones. These cones come in three different types, S, M and L, sensitive to various parts of the spectrum. The S type cones are sensitive to the blue part of the spectrum and are also often called Blue cones, In the same way the other two are often called Green and Red.
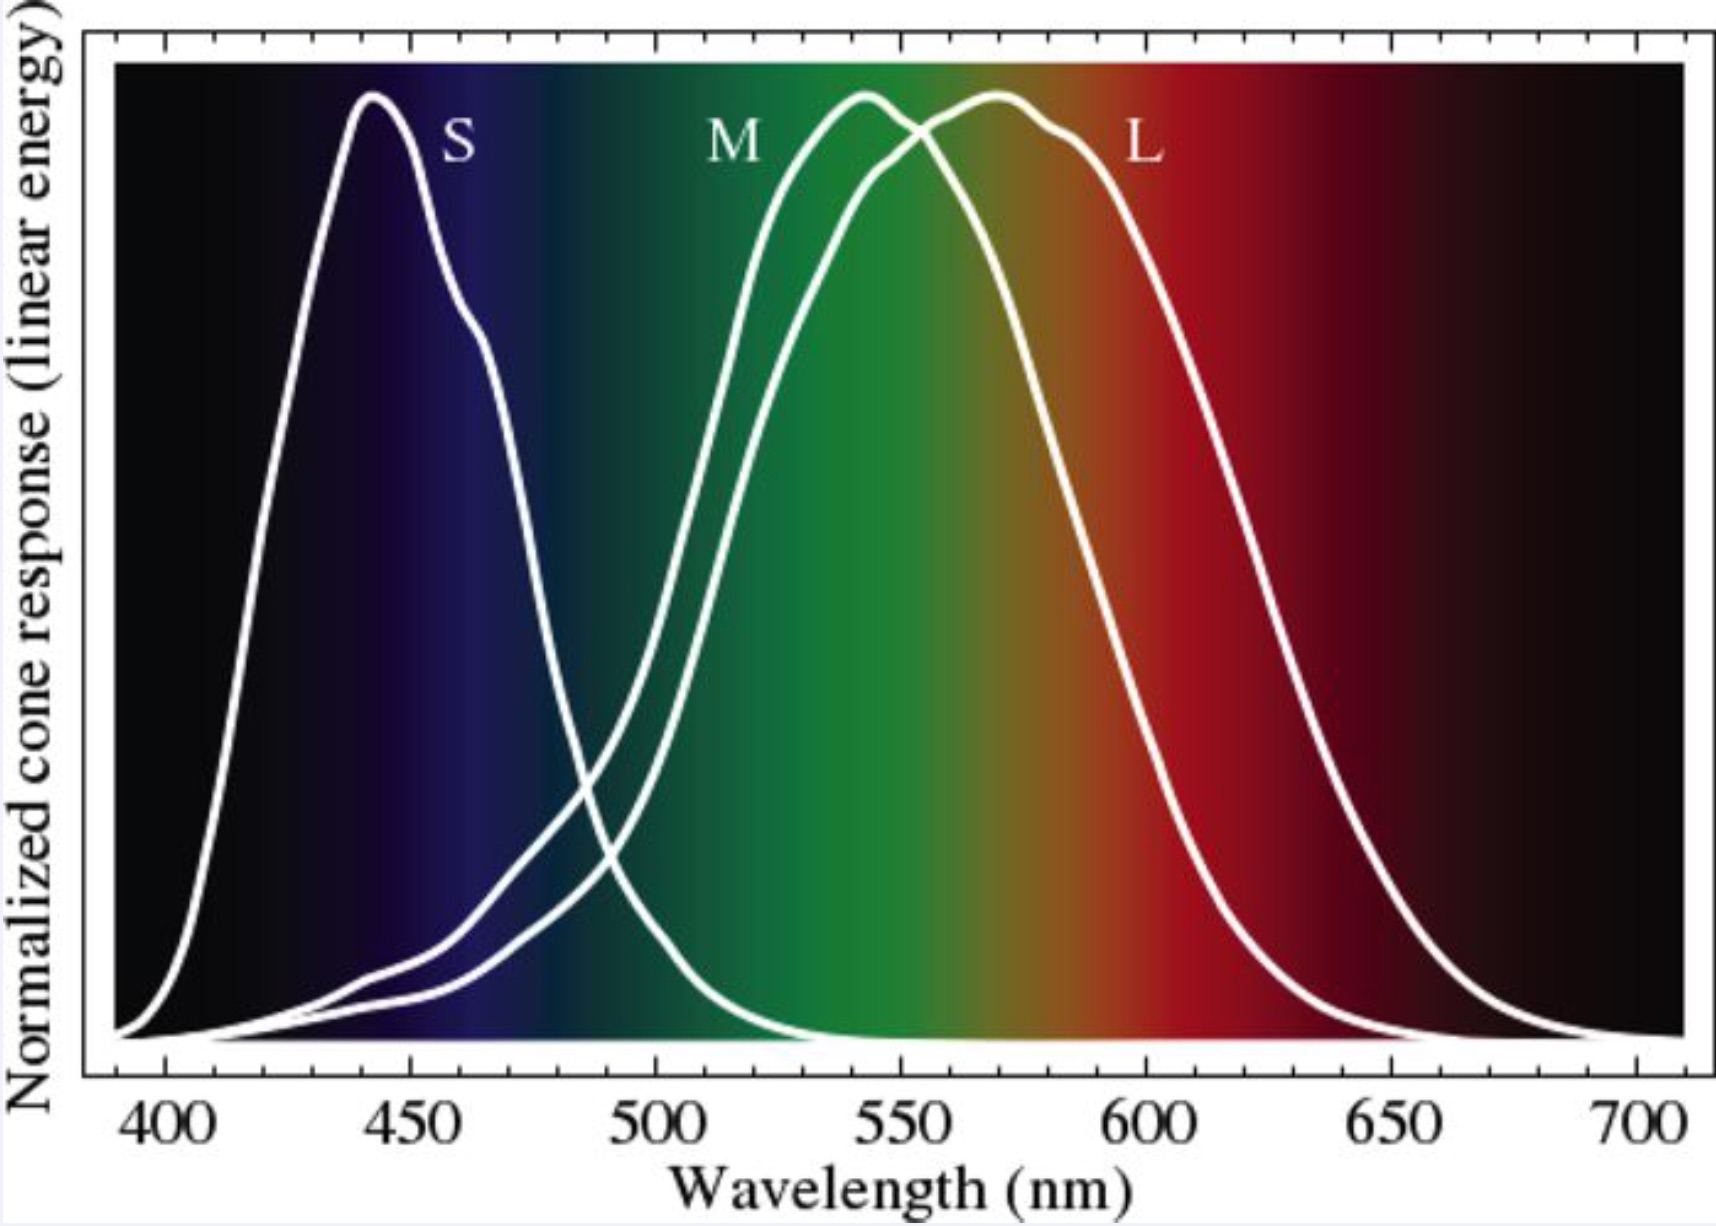
The brain is able to combine the response of these RGB- cells. For some people the M and/or L cone cells are not working properly. As a result they are colorblind.
———————————————–
How does a digital camera record colors?
Digital cameras have sensors consisting of millions of individual pixels that record the intensity of the incoming light, basically in a gray scale (black and white). That these cameras can take color pictures is because in front of the sensor there is a color filter, consisting of a mosaic of millions of red, green and blue “pixels”. A so-called Bayer filter. See the diagram below. Taking a picture, means actually taking a red, green and blue picture at the same time, but these pictures are “incomplete”. By mathematical techniques (interpolation) the full color pictures are constructed.
.

Here is an example, where three images, in red, green and blue, when combined, give the full image in natural colors.

The sensors in space telescopes do not have these Bayer filters, they just record the image in gray scales. However, various filters can be placed in front of the sensor and multiple images can be taken of the same object. For example, the Hubble WFC3 camera has a huge choice of filters, 47 for the UVIS channel and 14 for the IR channel.
Why so many? Some filters are broadband, they pass a wide range of wavelengths. From a scientific point of vew the narrowband filters are interesting because they pass only the light emitted by specific elements. Here is one example, hydrogen (H) emits red light with a very specific wavelength of 656 nm. So one of the filters only passes wavelengths around that value and a picture taken with this filter shows the presence of hydrogen. Similar filters can be used to check the presence of oxygen (O), sulphur (S) etc.
———————————————–
The Pillars of Creation pictures are “false-color” pictures!
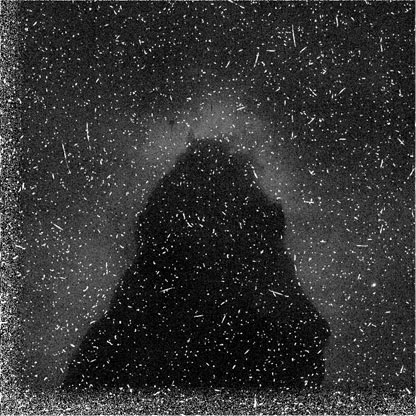
On 1 April 1995, astrophysicists Jeff Hester and Paul Scowen published an article The Eagle Nebula, in which they showed a picture of the Pillars of Creation. If you think that was “just” a picture taken by the Hubble telescope, you are seriously mistaken. The PBS/NOVA website More than just a pretty picture explains in 19(!) webpages how the iconic photo was created. Very readable,
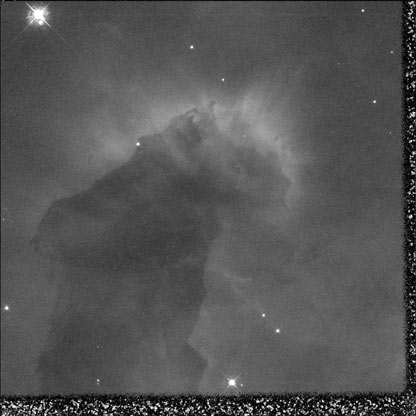
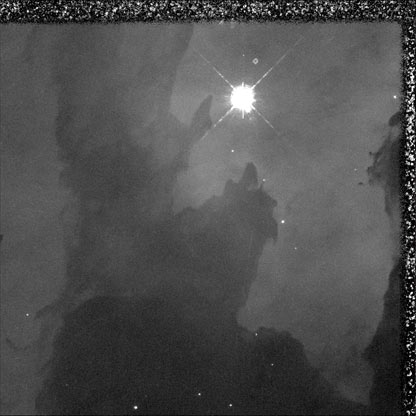
The WFC2 consisted actually of four cameras, each recording a quadrant. The top-right quadrant camera was slightly different, zooming to show more details. Resizing it to the format of the other three, causes the characteristic Hubble image with the “steps” in one corner. Here is the original image of this top right quadrant, in gray scales. What a mess. For an explanation how to clean this image, see the website. The second image shows the result of the various cleaning operations. What a difference !

We can do the same for the other quadrants.
Now we can “glue” the four parts together. You can still see a bit the seams between the four images.

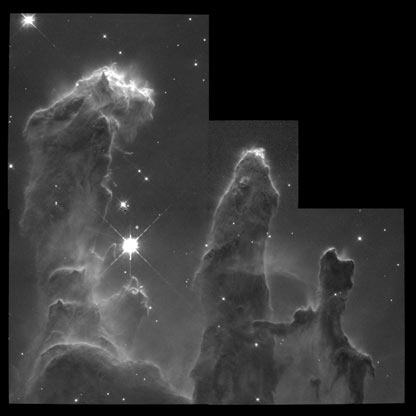
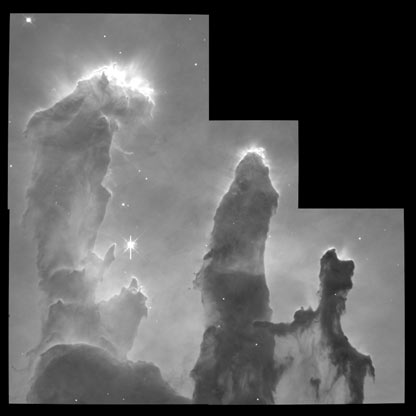
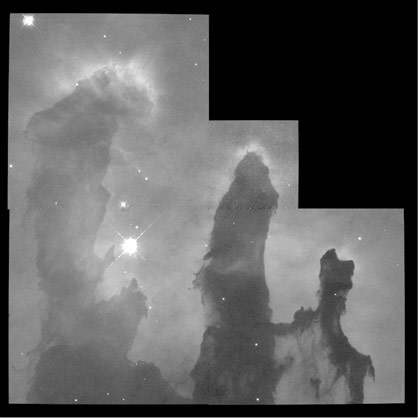
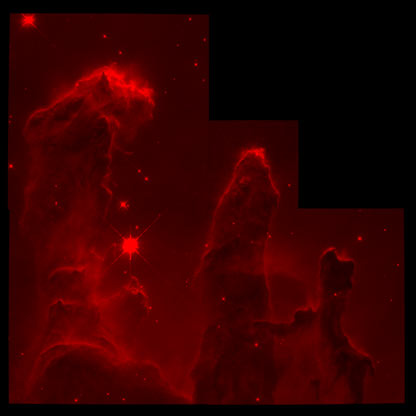
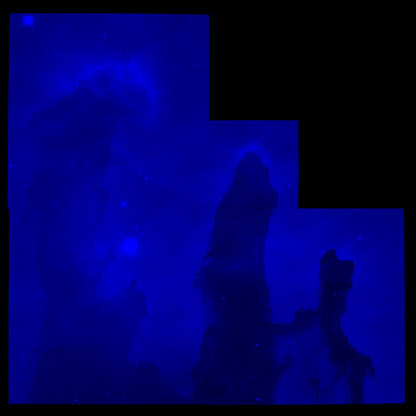
For this mage a filter was used that only let blue-green light through from (doubly ionised) Oxygen atoms (OIII). Two more filters were used to create images in the same way. One filter let only the reddish light from Hydrogen atoms through (Ha), the other one selected reddish(!) light from ionised Sulphur atoms SII). Three narrowband filters, two of them in the same color range.
Here are the three filtered images
You might expect that the next step would be to give these image’s color corresponding to the filter used for each of them. The Ha and SII reddish and the OIII one greenish. But that is NOT what Hester and Scowen did. They assigned the RGB colors to the three images. Blue to the OIII image, Green tot the Ha image and Red to the SII image.

Final step is to combine them: the Pillars of Creation.
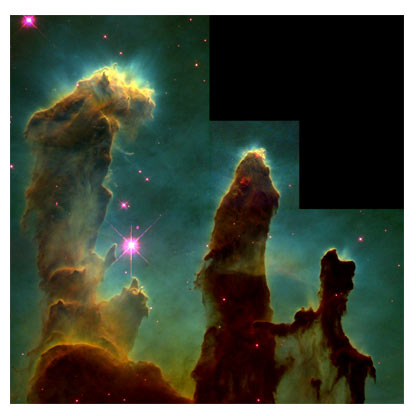
The main reason to assign “false colors” to the pictures is to enhance the contrast and to see how the various elements are distributed. Almost all Hubble photos are false color (also called pseudo color). Using the three narrowband filters for S, H and O and assigning them to RGB is so common that it is often called the Hubble Palette. Doing a Google image search for Hubble Palette gives a huge number of hits. Here is a part.

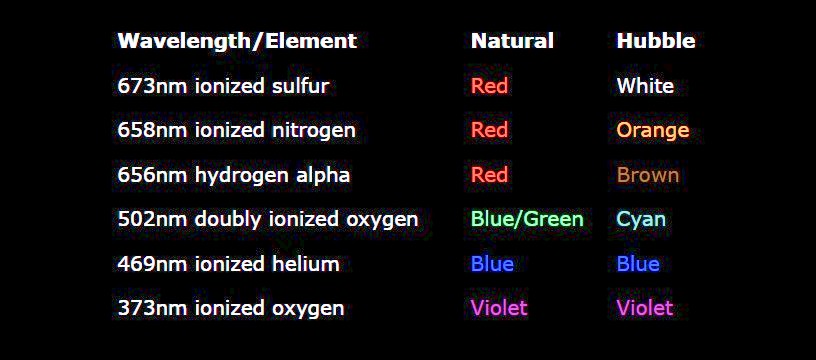
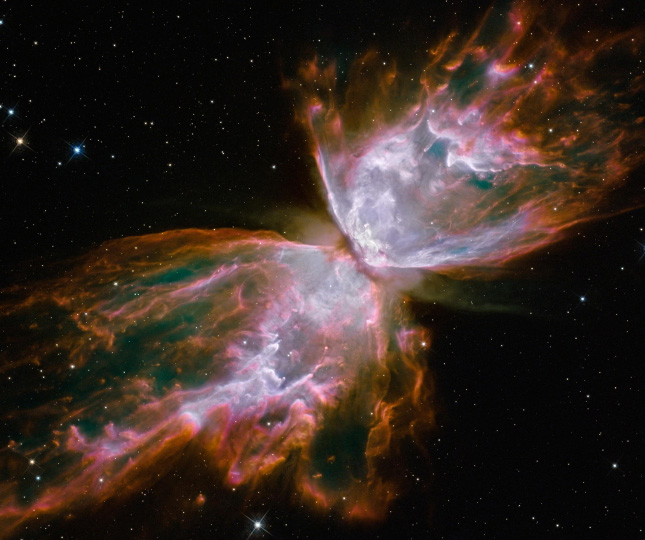
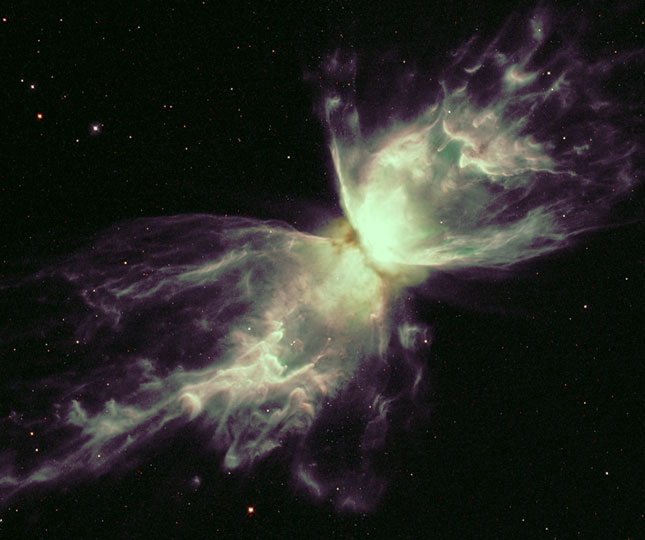
Other combinations of narrowband filters are also used. Here is an example where 6 filters have been used for the Butterfly Nebula. Besides SII, Ha and OIII, also ionised nitrogen, helium and oxygen. In the table the natural colors are given and also the colors assigned in the Hubble palette.
An American astrophotographer got curious how this nebula would look in the natural colors. Here are two images’, left the false color one and right the picture in natural colors. It is clear that the artificial image reveals many more details
It must be clear now that while with the Hubble telescope you have a choice to use false colors, with the JWST there is no other option, as infrared light is not visible. Here are the filters used for the MIRI camera. The colors suggested for the various infrared ranges are not significant, just to guide the eye.

For the MIRI picture three filters were used, F770W, F1130W and F1500W. In the above diagram I have marked them. For this picture they are assigned Blue, Green and Red respectively.
The NIRCam camera has many more filters, broadband, narrowband etc.
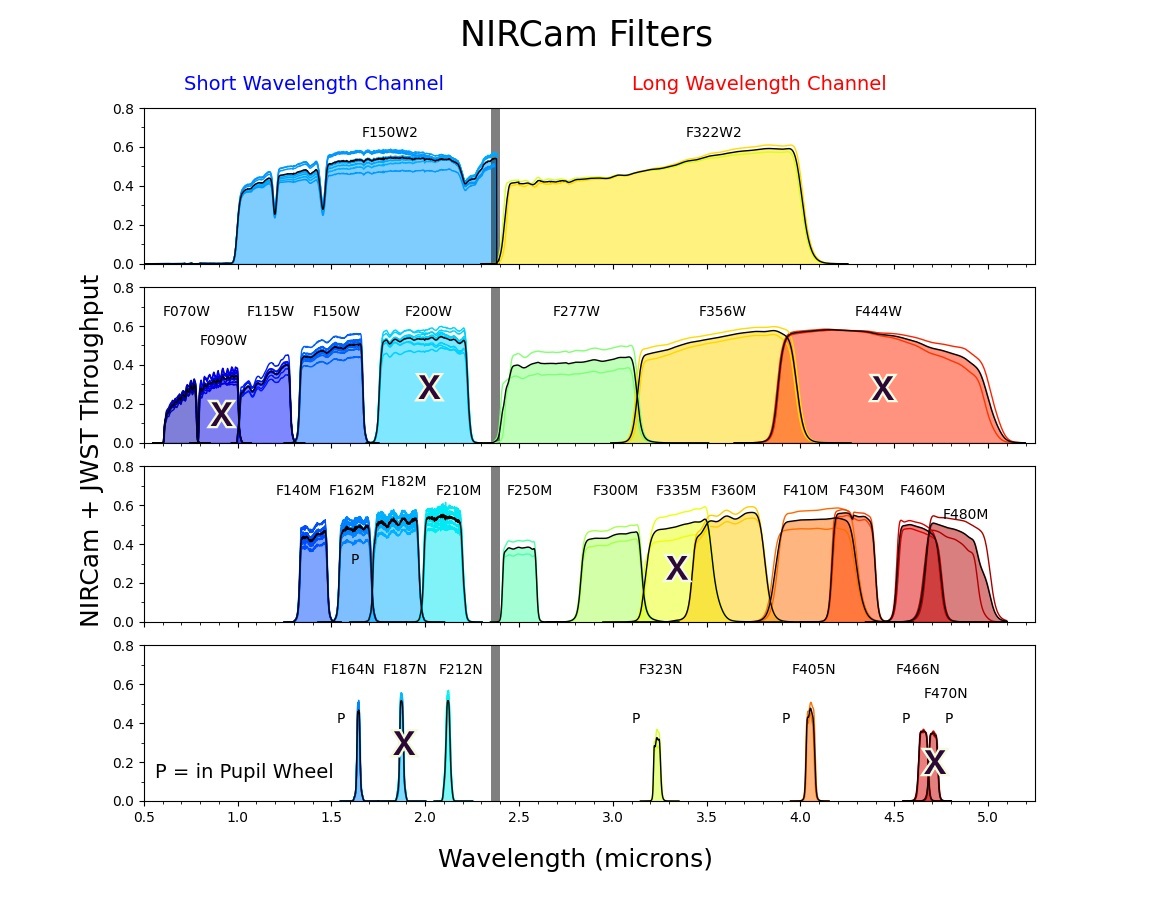
For the NIRCam picture 6 filters have been used, marked in the diagram above.
I have read somewhere that creating these images should be considered as art and I agree.
———————————————–
The Eagle Nebula
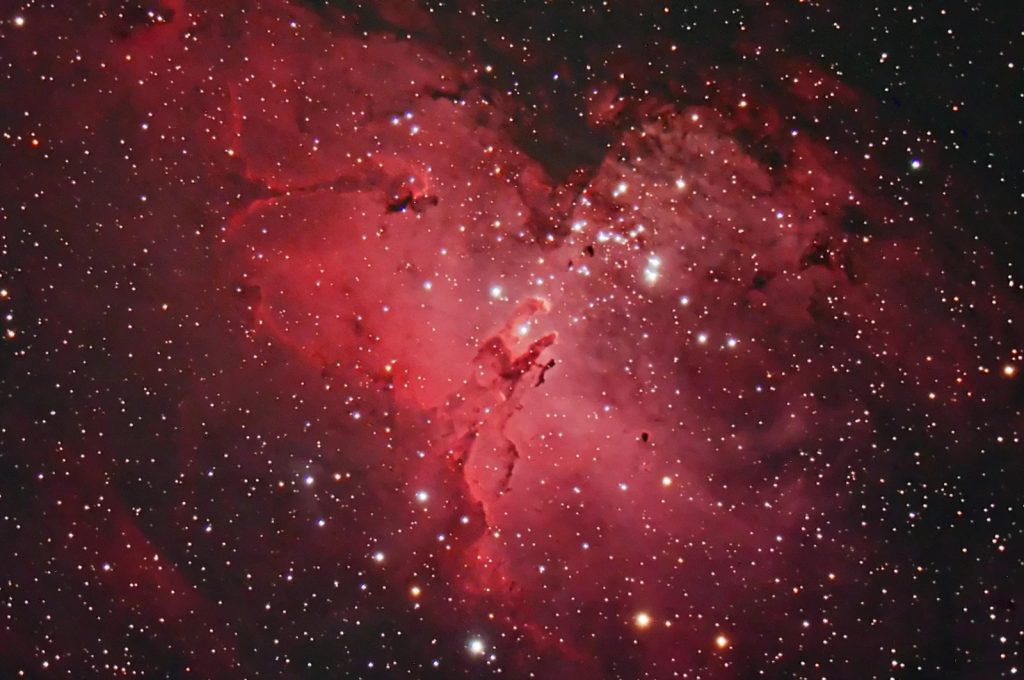
Finally a few remarks about the Eagle Nebula. When massive stars die, they can “explode” as a supernova, erupting their remnants into space. In these clouds of dust and various elements, new stars can be formed. The Eagle Nebula is such a cloud, here is a picture taken by an astrophotographer, using a telescope and a DSLR camera! Many of the bright spots in this picture are young stars already formed in the cloud. These stars are so hot that they emit UV light and even X-rays. This radiation can has enough energy to ionize the cloud. Such a cloud is called an emission nebula. The dominant reddish color is caused by hydrogen
The Eagle nebula is located about 7000 lightyear away and is huge, roughly 70 x 55 lightyear. It is a young nebula, estimated age is 5.5 million year. It is also a temporary event, the forming of new stars still continues and the radiation those stars will erode the nebula.
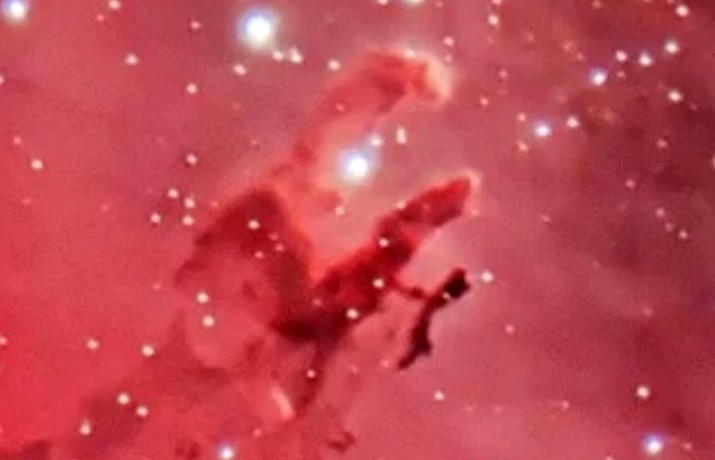
In the center of the above image, you can see the pillars of creation.Here is a dteail. Comapre it with the images of Hubble and Webb. Even these pillars are huge, the logext one is about 4 lightyear long.
A final remark. From the Hubble and Webb picture you might think that the pillars are almost like rock, impenetrable. But this is not true at all. The density of nebulas varies between 100 – 1 million particles per cubic cm. A high vacuum on earth still has considerably more particles per cubic cm. It is just the huge size that makes the pillars look like solid.
Wow. Thanks for this jan
I think I understood most of it !!
Haha. But truly incredible what these
Telescopes are revealing.